Posted on

Fix Your Biggest Misses With 4 Drills and Golf Swing Feedback Examples

Golfer reviewing swing feedback during practice

Good feedback follows a simple formula: a short cue you can say or hear in five words, an objective checkpoint you can see or measure, and a specific drill that proves the change happened. “Shift before you turn” is feedback. Watching your lead hip clear on video before your shoulders open is the checkpoint. The rest of this guide groups dozens of these cue-checkpoint-drill combinations by the fault they fix, so you can find your problem and start correcting it this week.


TL;DR:

  • Short cues paired with objective checkpoints and drills help verify changes and ensure progress is tangible during practice sessions.
  • Focusing on one key aspect per session, such as sequencing or low point, prevents confusion and accelerates improvement.
  • Video recording from down the line and face-on angles enhances accuracy in assessing swing faults and tracking progress over time.
  • Drills like the Baby Powder Low Point and Skipping a Stone reinforce correct sequencing and path, translating feedback into muscle memory.
  • Corrective feedback is most effective when paired with specific drills, measured by clear checkpoints, and reinforced through consistent, targeted practice.

Table of Contents

Golf Swing Feedback Examples Grouped by What You’re Fixing

The best feedback never floats in the abstract. It attaches to a body part, a moment in the swing, and a visible result. Below are usable lines organized by goal, drawn from how teaching professionals actually talk to students on the lesson tee.

Setup and posture feedback:

  • “Feel your weight centered between both feet, not favoring your heels or toes.” Checkpoint: a coach or phone can nudge your shoulder forward and backward. You should feel stable, not tipping.
  • “Let your arms hang from your shoulders instead of reaching for the ball.” Checkpoint: there’s a fist-width gap between your hands and your thighs at address.
  • “Hinge from your hips, not your waist.” Checkpoint: your spine stays relatively straight while your chest tilts toward the ball, verified from a face-on video angle.

Setup fundamentals matter because they set the ceiling for everything downstream. A balanced setup with centered pressure and proper hip hinge is worth checking before you touch anything in the swing itself.

Sequencing and power feedback:

  • “Start down with your hips, not your hands.” Checkpoint: on video, the lead hip has already begun rotating before the club drops below shoulder height.
  • “Feel like your lower body starts the downswing while your upper body is still finishing the backswing.” Checkpoint: a visible gap, sometimes called separation, between hip turn and shoulder turn at the top of the transition.
  • “Push off your trail foot like you’re stepping toward the target.” Checkpoint: trail heel comes off the ground earlier in the downswing than it used to.

Path and face control feedback:

  • “Feel like the club is dropping into the slot behind you before it comes forward.” Checkpoint: from behind, the shaft points closer to the ball-target line at the halfway-down position, not across it.
  • “Close the face a touch earlier in your downswing.” Checkpoint: face angle relative to path narrows on launch monitor or app data.
  • “Swing more around your body instead of over the top.” Checkpoint: your downswing path avoids cutting sharply outside your original swing plane.

Contact and low-point feedback:

  • “Find the ball, then the ground, in that order.” Checkpoint: divots (if hitting irons) start just ahead of the ball position, not behind it.
  • “Keep your chest moving toward the target through impact.” Checkpoint: sternum has passed the ball at the moment of contact, confirmed on down-the-line video.
  • “Trust that your low point happens after the ball, not before it.” Checkpoint: consistent, shallow divots on the target side of where the ball sat.

Balance and finish feedback:

  • “Hold your finish for a full three count.” Checkpoint: you can actually balance there without stepping or falling toward the target.
  • “Let your finish tell you what happened.” Checkpoint: a finish leaning back usually pairs with a scooping motion; a balanced, chest-up finish usually pairs with solid strikes.

Each of these lines works because it’s short enough to remember mid-round and specific enough to verify. Vague feedback like “swing smoother” gives you nothing to check. “Start down with your hips” gives you a body part, a sequence, and a video frame to confirm it.

Drills That Turn Feedback Into Muscle Memory

Feedback without a drill is just a comment. A drill is where the cue becomes a repeatable motion, and a handful of PGA-recognized exercises do most of the heavy lifting for the faults golfers actually bring to the range.

  1. The Care Bear Stare drill. Take your setup, then rotate your chest and belt buckle to face an imaginary target down the line, like the cartoon bear’s chest beam. This trains rotation through impact instead of a handsy flip. It confirms the “let your finish tell you what happened” checkpoint above.
  2. The Baby Powder Low Point Drill. Spray a thin dusting of baby powder or foot spray on the ground where the ball would sit, then make practice swings without a ball. The mark left behind shows you exactly where your club bottoms out. If the smudge sits behind where the ball would be, you’re hitting fat; if it’s well ahead, you may be scooping. This drill directly trains the “find the ball, then the ground” cue.
  3. The Skipping a Stone drill. Imagine skipping a flat stone across a pond with a sidearm throwing motion. The shallow, sweeping release mirrors the shaft’s ideal path into the ball and helps golfers who dig too steeply feel a flatter, more rounded approach into impact.
  4. The Step-Change drill. Set up normally, then take a small step with your lead foot toward the target as you start your downswing. This exaggerates the “push off your trail foot” and “start down with your hips” feedback until the sequencing feels automatic without the step.

These four drills come recommended by PGA coaching sources specifically because they give instant, visible confirmation rather than asking golfers to guess whether a change worked.

Run each drill in blocks of several reps before you hit a single ball, then hit a few shots trying to recreate the same feeling. Give it a full practice session, not three swings, before judging whether it’s sinking in.

Pro Tip: Pick one drill per range visit. Trying the Care Bear Stare and the Baby Powder drill in the same session usually means you learn neither one well, because your brain can’t prioritize two new feelings at once.

Common Swing Faults and the Feedback That Corrects Them

Most swing problems trace back to a short list of repeat offenders. Matching the right cue and drill to your specific miss saves you from guessing your way through a bucket of range balls.

  • The slice. Cause: an over-the-top downswing path with an open clubface at impact. Feedback: “Feel the club drop behind you before it comes forward.” Drill: Skipping a Stone, paired with alignment sticks laid outside the ball to block an outside path. Checkpoint: face-on video shows the downswing path staying inside the takeaway path rather than crossing over it. A deeper breakdown of slice-specific fixes lives in Golf Blab’s guide on correcting a golf slice.
  • Early extension. Cause: hips thrusting toward the ball during the downswing, which pushes the upper body up and out of posture. Feedback: “Keep your hips back in the same space they started in.” Drill: swing with a chair or alignment stick just behind your trail hip at address; if you bump it during the downswing, you’ve extended early. Checkpoint: hip-to-spine angle holds steady on down-the-line video through impact.
  • Casting or early release. Cause: the wrists unload too soon, losing lag before the club reaches the ball. Feedback: “Feel like you’re throwing the clubhead late, after your hands have already passed your hip.” Drill: the Baby Powder Low Point Drill, watching for a mark well ahead of ball position. Checkpoint: lead wrist stays flat, not cupped, at impact, a condition impact-focused coaching treats as a primary target.
  • Poor sequencing (arms starting the downswing). Cause: shoulders and arms fire first instead of the lower body. Feedback: “Shift, then turn.” Drill: the Step-Change drill. Checkpoint: hip rotation visibly precedes shoulder rotation in slow-motion video, matching the “shift then turn” sequencing principle that underlies most consistent ball striking.
  • Inconsistent low point. Cause: the swing’s bottom shifts unpredictably behind or ahead of the ball from swing to swing. Feedback: “Trust the shift, let the low point follow.” Drill: Baby Powder Low Point Drill repeated for ten swings to check for a repeatable smudge location.

Fix one fault per range session. Trying to correct a slice and casting simultaneously usually means neither correction gets enough reps to stick, and you leave more confused than when you arrived.

How to Get Real Feedback Instead of Guessing

Feel lies more often than it tells the truth. What feels like a big weight shift on the course is often barely visible on camera, and what feels like a minor adjustment can be the exact fix your swing needed. Objective feedback closes that gap.

Record two angles, not one:

  • Down the line, camera set behind the ball on the target line, to check swing path, shaft plane, and how far the club drops “into the slot.”
  • Face on, camera set perpendicular to the target line at chest height, to check hip shift, spine tilt, and how level your shoulders stay through the swing.

On playback, slow the video to quarter speed and watch for four things: how far the hips shift laterally before they rotate, whether the chest bend at address holds through impact, where the low point falls relative to the ball, and whether the clubhead path stays inside or drifts outside the takeaway line.

Smartphone-based motion analysis apps have made this kind of measurement available without a launch monitor. One documented case showed a golfer’s Handicap Index drop from 17.9 to 15.2 after using an app-guided program that compared his swing against a 3D motion model and prescribed specific drills. Tools like Sportsbox AI convert ordinary video into numbers for pelvis turn and chest bend, flagging early extension and excess hip rotation that the naked eye tends to miss entirely.

Apps are excellent for establishing a numeric baseline and tracking whether a metric is trending the right direction. They’re weaker at explaining why a metric is off or which drill fits your specific body and tendencies. A coach who reviews the same footage and layers on personalized cues, ideally ones that respect your natural ball flight rather than forcing a textbook position, tends to close that gap faster than either tool working alone.

A One-Checkpoint-Per-Session Practice Plan

Trying to fix your grip, your takeaway, and your hip turn in the same session is the fastest way to fix nothing. A four-week plan built around a single checkpoint per week gives each change enough repetition to actually stick.

  1. Week 1: Setup and balance. Warm up with ten slow-motion swings checking pressure distribution. Hit balls only after confirming, via phone video, that your weight sits centered at address. Track one metric: number of balanced finishes out of ten swings.
  2. Week 2: Sequencing. Run the Step-Change drill for fifteen reps before hitting balls. Record face-on video every ten shots. Track whether hip rotation visibly precedes shoulder rotation.
  3. Week 3: Low point. Start with the Baby Powder Low Point Drill. Hit ten shots, checking divot location on grass or mat marks on turf-friendly ranges. Track how many of ten shots show a low point ahead of the ball.
  4. Week 4: Path and face. Use the Skipping a Stone drill as a warm-up, then hit shots with alignment sticks marking your target path. Track how many shots start on line versus how many leak right or left.
Week Focus checkpoint Primary drill What you’re tracking
1 Balanced setup Weight-shift check Balanced finishes
2 Hip-before-shoulder sequencing Step-Change drill Video confirms hip leads shoulder
3 Low point ahead of the ball Baby Powder Low Point Drill Divots ahead of ball
4 Swing path and face angle Skipping a Stone drill Shots starting on target line

PGA-cited coaching consistently points back to the same principle here: limiting changes to one checkpoint per session prevents you from undoing progress you made the week before. Resist the urge to layer in a second fix just because the first one felt easy.

Where This Practical Approach Comes From

This piece draws on PGA-cited drills, teaching-professional sequencing guidance, and video/AI swing-analysis findings to ground every cue in something verifiable rather than folklore. Golf Blab’s own video feedback guide and swing sequence breakdown expand on the diagnostics above, and Golf Blab’s partnership with LPGA pro Mariel Galdiano keeps the instructional content connected to tour-level standards.

Matching Feedback to Your Skill Level

A beginner and a low-handicap player can have the exact same fault, an over-the-top path, and need entirely different feedback for it.

Beginners need feedback anchored to one visible outcome, not a swing position. “Feel like you’re throwing the club at the target after your hands pass your hip” works better than a technical cue about shaft plane, because a new golfer has no frame of reference for plane yet. Keep the drill list short: the Baby Powder Low Point Drill and basic balance checks cover most early misses without overwhelming a golfer still learning what a good strike feels like.

Intermediate golfers who already understand basic terms can handle sequencing-specific feedback like “shift, then turn” paired with video confirmation of hip-to-shoulder separation. This group benefits most from the Step-Change drill and from comparing face-on video across sessions to see whether a change is actually holding up under pressure, not just on the range.

Advanced players often need feedback at the level of degrees and milliseconds rather than feel. “Your chest bend is opening two degrees early relative to your baseline” means something to a player who’s already tracking numbers through an app or a coach with a motion-capture setup. At this level, feedback should reference the golfer’s own historical data, not a generic benchmark, since advanced swings vary more by design than by flaw.

Mismatching depth wastes practice time either way. Give a beginner a launch-monitor spreadsheet and they’ll practice the wrong things. Give a scratch golfer only “swing smoother” and they’ll rightly ignore you.

Feedback approaches across three golf skill levels

Making Feedback Feel Like Progress, Not Criticism

Corrective feedback lands better when it’s paired with a signal that something is already working. “Your hip shift step is way better before you get to the top of your finish” acknowledges real change and points to the next thing to work on, versus flatly saying “your finish is still off.”

A few positive-framing techniques that hold up on the range:

  • Name the specific improvement, not a general compliment. “Your low point moved two inches closer to the target since last week” carries more motivation than “nice swing,” because it proves the practice plan is working.
  • Compare against the golfer’s own baseline, not a pro or a playing partner. Progress relative to last month’s video is almost always more encouraging, and more accurate, than progress relative to someone else’s swing.
  • Frame the next fix as building on strength. “Your sequencing is solid now, so let’s use that base to clean up your face angle” reads as forward momentum rather than a new complaint.

None of this means softening honest feedback about what still needs work. It means sequencing the conversation so the golfer hears both the win and the next target, which tends to keep motivation higher across a multi-week practice plan than criticism alone.

Handling Multiple Feedback Points at Once

A single video review or lesson can surface five things worth fixing. Trying to act on all five is how golfers end up more confused after a lesson than before it.

Prioritize by asking which fault sits earliest in the swing sequence. A setup issue or a sequencing flaw in the downswing transition usually causes secondary problems further down the chain, like an open face or an early low point. Fix the root cause first, and some of the “smaller” issues on your list often improve on their own without direct intervention.

When two faults seem equally foundational, prioritize whichever one shows up on the impact-condition checklist: lead-wrist angle, low-point location, and clubface relative to path at impact. These variables, emphasized in impact-focused coaching, tend to be the actual cause of poor results, while positions earlier in the swing are often just contributing factors rather than the direct problem.

Write down every point a coach or app gives you, but only carry one into your next practice session. The rest wait their turn.

Feedback Mistakes That Waste Practice Time

The most common misapplication of feedback is treating a feeling as a fact. A golfer told to “shift your weight earlier” often overcorrects into an exaggerated slide, feels dramatically different, and assumes it’s fixed, without checking video to confirm the actual body position changed at all.

A second mistake is applying feedback meant for full swings to short game shots, or vice versa. “Shift then turn” matters enormously for driver distance and consistency; it matters far less for a ten-foot chip, where a more compact, arm-driven motion is often correct. Feedback needs a shot-type filter, not a one-size-fits-all application.

A third mistake is chasing a pro’s swing position instead of your own natural tendencies. Coaching philosophy from PGA sources consistently favors letting a golfer “swing your swing” over forcing a copied position, since body type, flexibility, and natural tempo vary enormously between players. Feedback that ignores those differences tends to create new problems while solving old ones.

Feedback Examples for Drives, Chips, and Putts

Full swing, short game, and putting all need feedback scaled to what actually matters for that shot.

For drives: “Feel like your trail foot pushes off before your arms swing through.” Checkpoint: trail heel rises earlier relative to impact than in a slower, less powerful swing. This cue targets the sequencing and power feedback covered earlier, since driver distance depends heavily on getting the lower body moving first.

For chips: “Keep your chest quiet and let your arms do the swinging.” Checkpoint: shoulder rotation stays minimal compared to a full swing, confirmed on face-on video. Low-point consistency still matters here, but the fix is usually a narrower stance and less lower-body movement rather than a bigger hip shift.

For putts: “Let the putter face stay square through impact, not just at address.” Checkpoint: on a straight-back-straight-through path drill using a mirror or alignment rod, the face doesn’t visibly rotate open or closed. Putting feedback rewards stillness more than any other shot type, the opposite instinct from the “shift then turn” cues that drive full-swing power.

The Real Lesson Buried in All This Feedback

Most golf instruction fails not because the advice is wrong but because it arrives disconnected from proof. A coach says “rotate more,” the golfer nods, and nothing changes because there was never a checkpoint attached to the cue. The example-first approach in this piece exists specifically to close that gap: every line of feedback here comes bundled with a way to verify it worked.

The Real Lesson Buried in All This Feedback — overview diagram

Where conventional advice falls short is treating feel as sufficient evidence. It isn’t. A golfer can feel like they shifted their weight and show almost no lateral movement on video. That’s not a character flaw, it’s just how proprioception works under the stress of hitting a ball.

If you take one thing from this article, take the discipline of pairing every cue with a drill and a checkpoint, and resist the pull to change three things in the same range session. Sequencing fixes, in particular, tend to unlock more downstream improvement than any single position-based tip, which is why it earns repeated emphasis here over cosmetic fixes.

*— Michael Marini

Turning Feedback Into Consistent Practice With Golf Blab

Reading feedback examples gets you started. Applying them consistently, session after session, is where most golfers stall out on their own. Golf Blab’s Play Golf with a Tour Pro experience puts you in front of someone who can watch your sequencing live and correct it in real time, which is the right move once video review shows a persistent fault rather than a one-off miss. For solo practice weeks, Custom Golf Club Labels keep your checkpoints and yardages visible right on the shaft, so the drill work from this guide travels with you onto the course instead of staying stuck on the range. If you’re ready for structured lesson content that builds on the sequencing and low-point principles covered here, browse Golf Blab’s Swing Like a Pro instructional program and start your next practice block with a plan instead of a guess.

Sources

Posted on

Stop Hunting for Wedges: 4 Color Keys to Personalize Your Golf Clubs

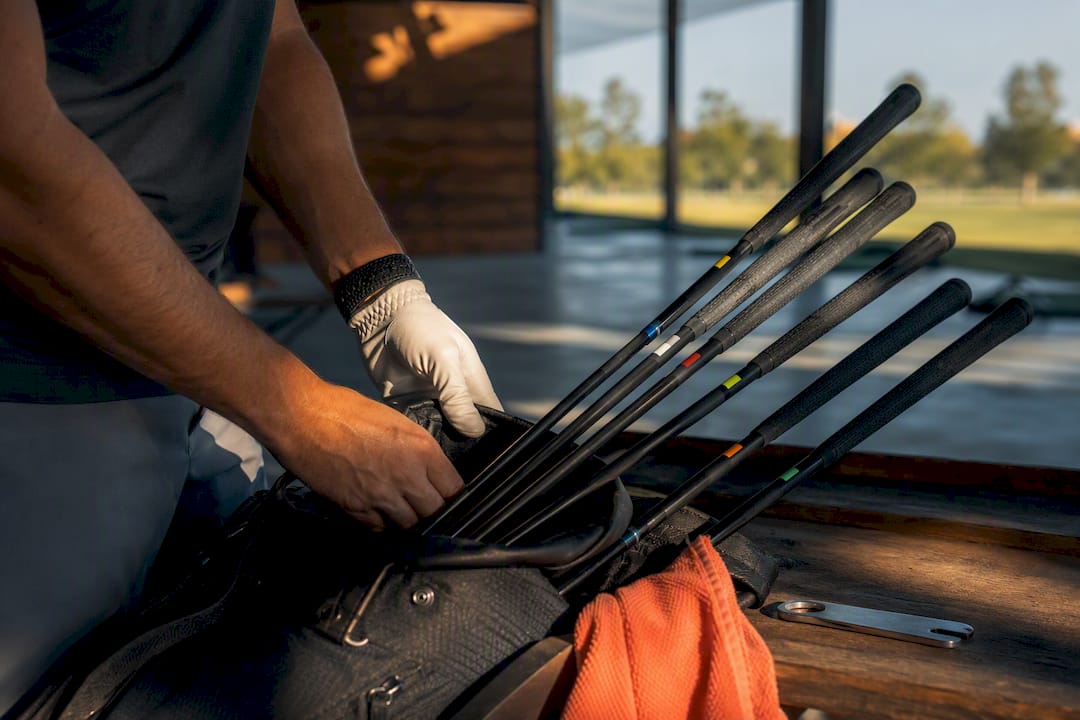
Golfer organizing color-coded club labels

Color coded golf clubs are personalized colored labels or tags applied to your shafts to identify, organize, and personalize your set. The fastest, most reliable starting point is waterproof vinyl labels placed just below the grip, with your wedges and putter labeled first as these clubs are commonly left behind near the green.


TL;DR:

  • Color-coded labels should be waterproof vinyl for durability, especially if you play frequently or in humid conditions.
  • Using no more than four to six color categories helps prevent confusion and maintains quick club identification during play.
  • Applying labels properly requires thorough cleaning and drying of the shaft with isopropyl alcohol to prevent peeling and ensure longevity.
  • Including contact information or QR codes on labels can greatly increase the likelihood of retrieving lost clubs, but consider privacy and speed tradeoffs.
  • Full set packs are usually more cost-effective than individual labels, and keeping a simple reference card helps you remember your color system over time.

Table of Contents

Why Color Coding Your Golf Clubs Actually Helps Your Game

A bag full of matte black shafts is a bag full of guesswork. Color coding solves that problem in two directions at once: speed on the course and protection off it. When your 7 iron wears a distinct color, you glance down instead of squinting at the number stamped near the hosel, shaving real seconds off pre-shot routines during a round with a foursome breathing down your neck.

  • Faster club recognition mid round, especially in low light or when clubs are jumbled in a cart bag
  • Labels that include contact information dramatically improve the odds a lost club finds its way home, and a short “reward if found” line on the label gives a good Samaritan a reason to actually make the call
  • Custom colors turn a set of clubs into a personal statement, which is exactly why labels have become a favorite golf gift
  • Visible phone numbers get you the fastest return path, while QR codes trade a little speed for privacy since the finder has to scan before seeing anything

That tradeoff between speed and privacy is worth thinking through before you order, not after a club goes missing at a public course you’ll never play again.

Four Color Coding Systems You Can Copy Today

Every golfer organizes differently, so pick the system that matches how you actually think about your bag, not the one that looks best on Instagram.

  1. By club type. Woods get one color, irons another, wedges a third, and the putter its own signature shade. This is the simplest system to maintain and the easiest for a playing partner to understand at a glance.
  2. By distance tier. Group clubs into “long” (driver, 3 wood, hybrids), “mid” (5 through 8 iron), and “short” (9 iron through wedges), assigning a color band to each tier. Great for players who think in yardage gaps rather than club names.
  3. By loft. Similar to distance tiers but built around actual loft numbers, useful if you carry an unconventional mix of hybrids and irons that don’t follow standard gapping.
  4. By role. Color-code around shot function instead of club category: approach clubs, scoring clubs, and recovery clubs each get a color, which suits players who think in shot shapes more than yardages.

If you swap a club mid season, relabel it into the matching category immediately rather than leaving it colorless. A half-finished system creates more confusion than no system at all.

Pro Tip: Keep a small reference card in your bag pocket listing your color key. It takes ten seconds to make and saves you from forgetting your own system three months later.

Vinyl, Laminate, or Metal: Choosing the Right Label Material

Material choice comes down to how hard you play and how much you care about the label disappearing into the shaft’s finish. Waterproof vinyl remains the default recommendation for most golfers because it’s inexpensive, easy to apply, and holds up fine through a normal season of play.

  • Waterproof vinyl: best overall value, ideal for full sets and easy replacement when styles change
  • Laminated thermal-transfer labels: built for heavier use, with stronger UV and moisture resistance for golfers who play year round or in humid climates
  • Metal tags: engraved brass or metallic finishes give a premium look, though they’re less subtle than vinyl and can stand out against modern matte shafts
  • QR code vs. visible phone number labels: QR protects your number from public view but requires an extra step from the finder; a printed number skips that step and gets a faster call
  • Bag-level trackers pair well with club labels for golfers who travel by air often, since a tracker covers the whole bag while labels identify each individual club inside it

How to Apply Club Labels Without Bubbles or Peeling

Clean prep is the difference between a label that lasts a season and one that curls up by the third round.

  1. Wipe the shaft with isopropyl alcohol and let it dry completely. Any residue from grip solvent or sunscreen will undercut the adhesive before it ever bonds.
  2. Position the label roughly an inch below the grip cap, where it’s visible during your setup but won’t interfere with your hands.
  3. Apply from one edge and smooth toward the other with steady pressure, pushing out air as you go rather than pressing the center first.
  4. For adhesives that call for it, a brief application of gentle heat with a hair dryer on low can improve the bond, particularly on cooler days.
  5. Check labels every few weeks for lifting edges. Catching a curling corner early means a quick reseal instead of a full replacement.

Pro Tip: Apply labels indoors at room temperature. Cold shafts and humid air are the two most common reasons a fresh label fails to grip on the first try.

What to Check Before You Order Custom Golf Club Labels

Not every label supplier is built the same, and a few overlooked specs separate a set that lasts from one you’re reordering by summer.

  • Confirm the adhesive is rated waterproof and UV resistant, not just water resistant, and check whether a laminate overlay is included
  • Look at the customization fields: how many characters fit, how many lines of text, and how many color combinations are actually available
  • Compare quantity pricing since full-set packs (typically 13 to 14 labels) usually cost less per label than ordering replacements one at a time
  • Check the supplier’s return or reorder policy in case a size doesn’t fit your shaft diameter
  • Confirm shipping timelines to your region before ordering ahead of a trip or a gift deadline

Buying a full-set pack up front is almost always smarter than ordering piecemeal, but keep the supplier’s reorder process in mind for the inevitable day a wedge takes a hard bounce off a cart path and the label doesn’t survive.

Fixing Peeling Labels, Fading Colors, and Mixed-Up Clubs

Peeling almost always traces back to surface prep, not the label itself. If a label lifts at the corner within the first few rounds, the shaft likely wasn’t fully dry or still had residue from grip solvent when it was applied. Strip it off, clean the shaft again with isopropyl alcohol, and let it air dry fully before reapplying. A label that peels repeatedly in the same spot on a graphite shaft may be running into a factory coating that resists adhesive. Try shifting placement an inch higher or lower to find a cleaner bonding surface.

Custom Golf Club Labels

Fading is a UV story more than a wear story. Cheaper printed vinyl without a laminate layer will dull noticeably within a season of regular play in direct sun, while laminated thermal-transfer labels hold their color far longer. If your colors are fading fast, that’s a signal to upgrade material on your next order rather than just reordering the same label.

Misidentification usually means the color system broke down somewhere, often after a mid season club swap. The fix isn’t more colors. It’s fewer categories, applied consistently. Four to six color groups is plenty for almost any bag. Beyond that, players start second guessing their own key, which defeats the purpose of color coding in the first place. When in doubt, simplify the system before you add another shade to it.

An Editorial Take on the Custom Label Boom

Most advice on golf club labels treats them purely as a lost and found tool, and that undersells what’s actually happening in golf right now. The clubs in your bag have quietly become one of the few pieces of sporting equipment a player can make entirely their own, and the personalization trend reflects something bigger than convenience. Golfers want their equipment to say something about them, the same way a custom headcover or a monogrammed glove does.

Where I’d push back on conventional wisdom is the idea that color coding is only worth the effort for competitive players tracking yardages with obsessive precision. The bigger use case is the casual golfer who just wants to stop hunting for the right wedge on a windy back nine, or the gift buyer who wants something more personal than another sleeve of balls. A curated label, cut cleanly and color matched with intention, beats a hand written Sharpie mark every time, not because the Sharpie fails functionally, but because it fails at the identity piece entirely.

The DIY route works fine if all you want is identification. But once personalization and durability both matter, a purpose built label with real adhesive engineering and a defined color palette earns its cost difference fast.

— Michael Marini

Where to Get Custom Color Coded Labels and Golf Gifts

Golf Blab’s Custom Golf Club Labels check every box this guide covers: waterproof vinyl construction, a wide color palette, and full customization down to the text and layout on each label. Ordering typically involves picking label size, choosing colors, entering text or contact details, and checking out. Full sets are usually designed to cover an entire bag, wedges and putter included.

If you’re shopping for someone else, pair labels with a Golf Blab E-Gift Card so the recipient can pick their own colors, or round out the gift with a piece from the apparel lineup. Labels are made to last through a normal season of play, and replacements are generally easy to reorder if needed.

Where to Get Custom Color Coded Labels and Golf Gifts — overview diagram

Sources

For deeper comparisons of label materials and application techniques, Great Results Golf’s roundup covers premium options like laminated and metal tags in more detail, while Cut Sheet Labels breaks down customization specs worth comparing before you order. Both are useful next stops if you want to see application photos before committing to a system.

Posted on

90 Day Plan to Build a Monetized Golf Personal Brand for Creators

Golf creator coaching learner at clinic

Pick your niche, publish one content pillar consistently for 30 days, and choose a single monetization path before you touch a second platform. Golf Blab has watched golfers try to build a personal brand by chasing every trend at once, and the ones who win instead treat the process like a portfolio, stacking a few deliberate income streams instead of gambling on virality. Give yourself 90 days: expect steady follower growth, a rising engagement rate, and your first inbound message from a brand or a student.


TL;DR:

  • Focusing on a narrow, well-defined niche with a specific audience leads to faster trust-building and better chances for sponsorship agreements.
  • Consistent visual branding, including signature apparel and equipment labels, significantly accelerates recognition and improves opportunities for partnerships.
  • Beginning with short-form videos for discovery and long-form content for authority, while repurposing materials, optimizes reach and trust across platforms.
  • Building multiple income streams such as affiliate deals, lessons, events, and product sales reduces dependence on a single revenue source.
  • Protect your brand legally by conducting trademark searches, obtaining permissions at courses and events, and clearly understanding endorsement contract terms.

Table of Contents

Brand foundation: choose your niche, audience, and brand promise

Every recognizable golf brand starts with a decision most golfers skip: who, specifically, are you talking to? A scratch golfer coaching weekend players sounds broad and forgettable. A former mini-tour player who teaches mid-handicappers how to break 90 without changing their swing has a promise people can repeat to a friend.

Evaluate a niche the way you’d evaluate a golf shot: distance versus accuracy. A huge audience (general instruction) gets you reach but drowns you in competition. A narrow audience (left-handed senior golfers fighting the shanks) gets you fewer eyeballs but near-zero competition and faster trust. Golfers who invest in a consistent, visible presentation tend to convert that recognition into sponsorship conversations faster than golfers who post at random.

Once you know your audience, draft a single sentence: “I help [who] do [what] so they can [outcome].” Then pick two or three content pillars that serve that sentence every single time you post. Pillars might include:

  • Swing-fix breakdowns for a specific miss (slice, chunk, thin shot)
  • Course strategy and mental game for weekend competitors
  • Gear reviews and setup tips filtered through your specific playing style
  • Behind-the-scenes access to lessons, events, or tournament rounds

Map the journey from there: a stranger discovers a short clip, follows for the pillar content, then buys a lesson, a product, or a spot at your next event.

Visual identity and voice: signature look, club labels, and posting boundaries

A brand needs a look people recognize before they read your caption. That starts with a signature item, not a wardrobe. Pick one hat, one polo, and a set of custom club labels you wear and show on every round, every clinic, every video thumbnail. Research on golf brand identity shows a consistent visible signature accelerates recognition and shortens the runway to sponsor conversations.

Custom Golf Club Labels

Keep the palette simple: two colors, one wordmark or monogram, one placement style for your labels across your irons and wedges. Consistency, not variety, is what makes a stranger’s brain flag you as “that golfer” on the third scroll past your content.

Voice matters just as much as visuals. Decide now what you will and won’t post: swing flaws, on-course frustration, family, politics, injuries. LPGA player Blair O’Neal has spoken openly about drawing a line between how she dresses off the course and how she presents herself on it, a distinction that protects both her brand and her long-term reputation.

Pro Tip: Write your posting boundaries down as a one-page document before you launch. It’s far easier to hold a line you set on day one than to walk one back after 10,000 followers are watching.

Content & platform strategy: formats that build reach and trust

Treat your channels like a funnel, not a broadcast. Short-form video pulls in strangers who’ve never heard of you; long-form content converts them into people who trust your judgment enough to pay for it. Here’s the sequence that works for most golf creators starting from zero:

  1. Start with short-form verticals. TikTok and Instagram Reels reward discovery over follower count, so a well-timed 30-second swing tip can outperform a channel with 10 times your audience. This is where strangers meet you first.
  2. Build a YouTube channel for authority. Long-form video is where you actually demonstrate expertise: full lesson breakdowns, course vlogs, gear tests. It’s also the format that supports affiliate links, ad revenue, and paid course sales in ways a 30-second clip never will.
  3. Repurpose relentlessly. One 15-minute YouTube lesson can become five to eight short clips, two carousel posts, a podcast-style audio cut, and a newsletter breakdown. You’re not creating five times the content; you’re slicing one piece of content five different ways.
  4. Set a minimum production template. A phone tripod, one light, and your signature polo are enough gear to start. Golf creators who commit to just 10 deliberate, on-brand posts in their first stretch see measurable audience movement before they ever buy a real camera.

Golf podcasts remain an underrated long-form lane too. If video isn’t your strength, audio interviews or solo breakdowns can build the same authority; a look at some of the best golf podcasts shows how varied the format can be while still building real audience trust.

Monetization & portfolio: build multiple income streams that fit your bandwidth

A single income stream is a single point of failure. The golf creators who build sustainable businesses spread revenue across several channels instead of betting everything on brand deals or ad revenue alone.

Consider these paths, roughly in the order most golfers add them:

  • Affiliate and gear partnerships — lowest barrier, good for early momentum
  • Paid lessons or clinics — high margin, limited by your hours
  • Brand partnerships — best pursued once your visual identity and audience are consistent
  • Live events and group outings — higher margin than digital products, and a natural extension of group learning experiences
  • Owned products — apparel, digital guides, or merch tied to your signature look

Golf creators building real businesses balance annual partnerships for baseline income against shorter contracts for flexibility, then layer in-person hosting on top because it pays better per hour than almost anything digital. When you negotiate a partnership, ask for at least one trackable deliverable (a promo code or link) and one longer commitment to stabilize the relationship rather than a single one-off post.

Price in-person work by comparing it to your lesson rate, not your follower count. A strong sponsorship playbook helps you understand what amateurs and semi-pros can realistically charge before you leave money on the table.

90-day launch checklist: tasks, starter costs, and KPIs

A brand doesn’t need months of planning. It needs a sequence.

  1. Week 1: Write your brand promise and pick two content pillars.
  2. Week 1: Choose your signature look, including your hat and polo.
  3. Week 2: Order custom club labels so your equipment matches your on-camera identity.
  4. Weeks 2 to 3: Assemble a minimum kit: phone tripod, one light, basic editing app.
  5. Weeks 3 to 6: Publish 10 pillar-aligned posts, no exceptions on consistency.
  6. Week 6: Build a one-page media kit with your niche, stats, and rates.
  7. Weeks 6 to 8: Reach out to five local businesses or brands aligned with your niche.
  8. Month 2: Launch one paid offer (a lesson package, a clinic, or a small product).
  9. Month 3: Review engagement rate and follower growth weekly; review bookings and leads monthly.
  10. Month 3: Reinvest early revenue into one upgrade, whether that’s gear or a second signature item.

Starter costs stay modest: a tripod and light typically run under $150, a signature polo and hat land in the $60 to $120 range combined, and custom labels are a one-time cost that outlasts several seasons of clubs.

Golf Blab proof points: using products and events to express your brand

A brand identity only works if it’s visible everywhere you show up, and that’s the exact gap Golf Blab was built to close. Personalized equipment and signature apparel give golfers a repeatable visual signature without hiring a designer or guessing at what “on brand” even means.

  • Custom Golf Club Labels turn a bag of clubs into a walking identifier, sparking the kind of “wait, what’s that on your iron?” conversation that starts real relationships with playing partners and potential sponsors.
  • Signature apparel (hats, polos, quarter-zips) creates the consistent on-camera look that audiences learn to recognize within a few posts.
  • Educational content and instructional resources give creators a credible library to point to when a brand asks, “What do you actually know?”
  • Play Golf with a Tour Pro, an event built around access to professional players, offers a fast, tangible way to add authority and content to a growing brand.

Golf Blab’s partnership with LPGA player Mariel Galdiano reflects the same principle driving this whole guide: credibility compounds when your products, your content, and your community-facing events all point in the same direction.

Personal branding mistakes to avoid specifically in golf

The most common mistake golfers make is confusing “posting often” with “posting on brand.” A slice-fix video, a vacation photo, and a rant about slow play might all get views, but they teach your audience nothing consistent about who you are. Every off-pillar post dilutes the recognition you’re trying to build.

The second mistake is copying a bigger creator’s tone instead of finding your own. Golf audiences are unusually good at detecting a manufactured persona, and creators who lean into authenticity instead report lower burnout and longer careers than those performing a version of themselves they can’t sustain.

A third pitfall: ignoring your handicap or skill level in your positioning. A single-digit golfer teaching total beginners without adjusting language creates a credibility gap the audience feels even if they can’t name it. Match your content to your actual playing level, or be transparent about the gap and reframe your value around strategy or mindset instead of ball-striking.

Finally, plenty of golfers wait too long to monetize, treating their brand like a hobby until burnout sets in from unpaid content creation. Structured programs, including LPGA-backed workshops on brand-building, exist precisely because turning presence into income is a skill, not an accident. Build the habit of asking “what does this post lead to?” early, and you’ll avoid months of content with no destination.

Case studies or examples of successful golf personal brands with key takeaways

Blair O’Neal built her brand around a clear boundary between her modeling background and her on-course persona, dressing in golf attire during play while keeping other content separate. That distinction let her sustain a long career without her golf credibility getting overshadowed by unrelated content, a lesson in knowing exactly what your audience came for.

Canadian golfer Mac Boucher took a different route, leaning into authenticity over a polished, corporate-style feed. His approach to social media prioritized being recognizably himself, and that consistency, more than production value, is what built a sustainable career instead of a short-lived spike in attention.

The broader pattern among golf creators who’ve turned an audience into a real business is a refusal to rely on a single channel or a single deal. They treat Instagram as a working resume, using visible follower engagement to convert into higher-margin, in-person opportunities like hosting and presenting, rather than waiting on ad revenue alone.

The takeaway across every example: a golf brand that lasts is built on a boundary, a consistent identity, and more than one way to get paid. Golfers who skip any one of those three tend to plateau early or burn out before the second year.

Trademark protection matters the moment your name or logo starts appearing on merchandise, event flyers, or sponsor materials. A basic trademark search before you commit to a name saves you from rebuilding a following under a different handle later, which happens more often than most golfers expect once a brand grows past a local following.

Image rights deserve equal attention. If you’re filming at a course, club, or event, understand who owns footage that includes other players, staff, or bystanders. Get written permission for anything beyond casual, incidental background presence, especially before using someone else’s likeness in paid promotional content.

Endorsement deals carry their own fine print. Read exclusivity clauses closely: some partnerships lock you out of competing categories for months, which limits your ability to run a true portfolio of income streams. Ask for a defined term, clear deliverables, and a straightforward exit clause before you sign anything tied to your name or image.

Key endorsement contract terms checklist

None of this requires a lawyer on retainer starting out, but a single consultation before your first paid partnership is worth far more than the cost of untangling a bad contract a year later.

Author perspective: authenticity, boundaries, and long-term brand health

A manufactured persona is exhausting to maintain and easy to spot. The golfers who build brands that last treat authenticity as a strategy, not a nice-to-have. Batch your content one day a week, set office hours for outreach, and outsource editing the moment it’s affordable. Try the 90-day plan honestly before you scale anything. If it feels sustainable at month three, it’s built to last.

— Michael Marini

Golf Blab is the shortcut to a visible identity without hiring a designer or waiting months for a following to notice you. Custom club labels give you the signature visual detail people remember, apparel like the Adidas Space Dyed Polo or the quarter-zip pullover builds the consistent on-camera look your audience learns to recognize, and Play Golf with a Tour Pro accelerates the credibility that usually takes years to earn on your own.

Start with the piece that shows up in every photo and every video: order your custom club labels and build your look around them. Not ready to commit to a full kit yet? A Golf Blab e-gift card lets you sample the products before going all in, and every purchase comes backed by Golf Blab’s straightforward return policy if it’s not the right fit.

Sources