
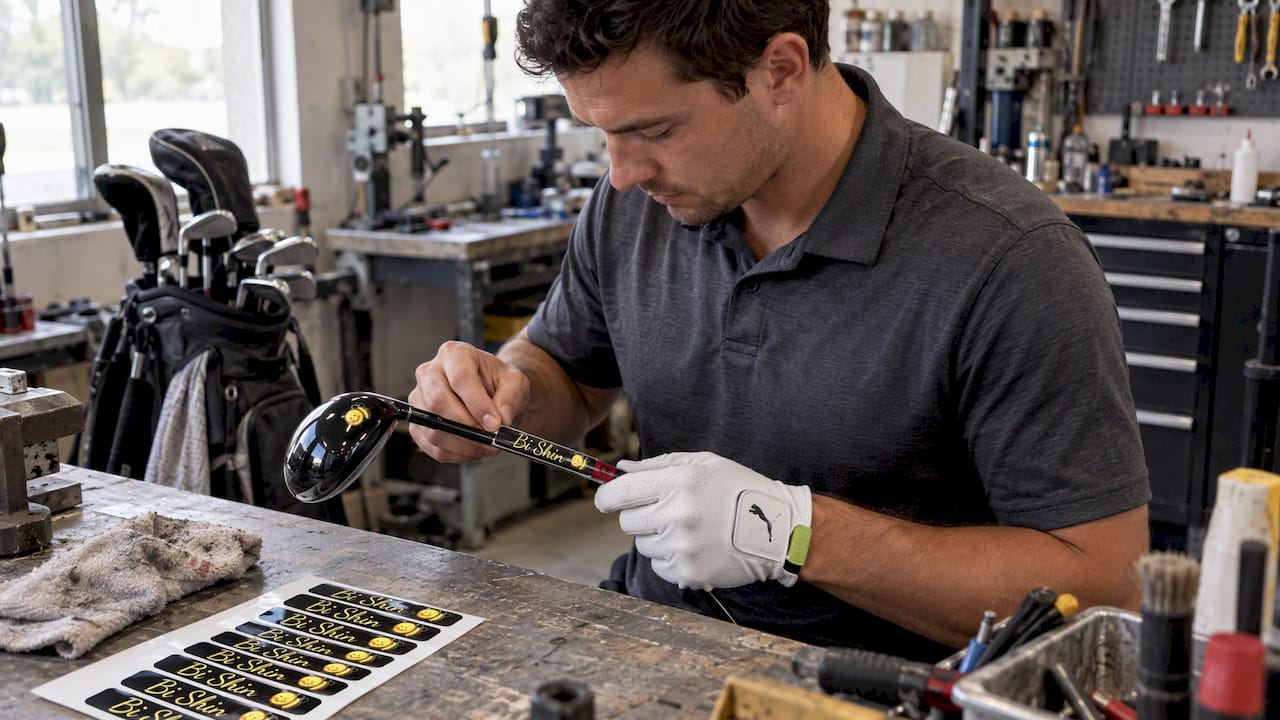
The safest and most practical way to stylize real golf clubs is with removable or semi-permanent labels and wraps applied off the hitting area, never across the face or in a spot that could double as an alignment aid. This approach lets you express your personality through color, initials, and finish while staying compliant with USGA equipment guidance. We offer custom club labels as a ready starting point for exactly this kind of personalization.
TL;DR:
- Custom decals and wraps should be applied outside the impact area and kept small to avoid violating USGA rules or acting as alignment aids.
- Vinyl decals are the most beginner-friendly, easily removable, and suitable for seasonal swaps, while shrink-wrap offers a seamless look with careful application.
- Placement is critical, with decals acceptable on the shaft, crown, and sole edges, but strictly prohibited on the hitting face or protruding as aiming aids.
- Proper cleaning, UV protective layers, and storing clubs away from heat significantly extend the lifespan of personalized labels.
- When ordering, measure carefully, choose complementary finishes, and consider UV protection for frequent outdoor play.
Table of Contents
- 1. Styling ideas you can order and apply today
- 2. What USGA rules allow and forbid
- 3. Comparing vinyl, shrink-wrap, and pressure-adhesive labels
- 4. Placement: where decals belong and where they don’t
- 5. Applying and removing labels without damaging the club
- 6. Caring for labels so they last
- 7. Where Golf Blab fits into this process
- An honest take on the personalization trend
- Order custom labels and coordinating gear
- FAQ
- Sources
1. Styling ideas you can order and apply today
Personalizing a set of clubs is less about overhauling the equipment and more about layering small, intentional details onto it, much like initials stitched into a leather bag or a family crest pressed into a signet ring. A few themes consistently deliver a polished look without touching anything that affects play, keeping the customizations subtle and compliant.
- Monogram or initials bands wrapped around the shaft just below the grip, a subtle nod to ownership and craftsmanship.
- Minimalist crown artwork on the driver, kept outside the impact area, for a signature without visual clutter.
- Numeric bands on wedges that mirror loft numbers, turning function into a design element.
- Color-blocked shafts paired with a matching headcover or bag strap for a set that reads as one cohesive statement.
Metallic or gloss trims catch light beautifully on a crisp, modern bag setup, while matte finishes feel more at home with a traditional, leather-and-wood aesthetic. Either direction works when the label material and finish complement the clubs rather than fight them visually. Our golf club personalization resources walk through how these themes translate into printable artwork, and our guide to color-coded clubs offers a practical starting palette for a full set.
Pro Tip: Pick one accent color and repeat it across your labels, headcover, and glove tab. A single recurring hue reads as intentional design, while three competing colors reads as clutter.
2. What USGA rules allow and forbid
Before you commit to any design, it helps to understand where the line sits between personal flair and an unintended rules violation. The USGA’s equipment interpretations permit temporary, non-permanent attachments such as identification decals on the shaft or clubhead, as long as they offer no performance benefit and never function as an alignment aid. Permanent modifications sit in different territory entirely: altering a club’s physical structure can affect its conformity, while a removable label generally does not.

The impact area itself is off-limits for decoration. Per the official Equipment Rules, decorative markings are permitted outside the impact area, though a small design within a 0.375-inch square may sit at its center provided it does not unduly influence how the ball comes off the face. Anything that protrudes, adds texture, or visually guides your eye along the target line risks crossing into alignment-aid territory. When a tournament or a club’s local rules leave you uncertain, the simplest move is to remove the attachment before you tee off.
3. Comparing vinyl, shrink-wrap, and pressure-adhesive labels
Not every material behaves the same way on a shaft or a crown, and the right choice depends on your comfort with heat tools and how long you want the result to last.
- Vinyl decals are the most beginner-friendly option: no heat required, easily removable, and well suited to shafts and small crown accents.
- Heat-shrink wraps deliver a seamless, factory-made look, but they demand a careful, even heating technique and a steadier hand.
- Pressure-activated adhesive wraps hold up well over a season of play, though it is worth checking whether the product includes a UV overlaminate to resist fading.
- Sizing and seam placement matter more than most golfers expect. Shrink-label methods described in industry patent filings outline how overlap seams and precise sizing keep a wrap looking clean rather than bunched.
Vinyl rewards golfers who want to swap designs seasonally, while shrink-wrap suits anyone chasing a finish that looks original to the club.
4. Placement: where decals belong and where they don’t
Getting placement right is the difference between a clean, rules-safe accent and a label that draws the wrong kind of attention from a rules official.
- Do place decals on the crown, outside the impact area, on sole edges, along the shaft, and on the butt end within standard size limits.
- Don’t apply anything to the hitting face, and never add raised or protruding accessories that could function as an aiming reference during a stroke.
- Keep every attachment low-profile and shaped to follow the club’s existing contours rather than adding bulk.
- Small identifiers like initials, a short monogram, or a numeric band on the shaft are reliably acceptable examples of this kind of personalization.
5. Applying and removing labels without damaging the club
A clean result starts before the label ever touches the club.
- Clean the surface thoroughly, measure the target area, dry-fit the label, and mask off any zone you want protected.
- For vinyl, apply slowly from one edge, smoothing out air as you go; for shrink-wrap, use even, moderate heat and keep the tool moving to avoid scorching the finish.
- To remove, warm the material gently and peel slowly, following with a mild adhesive remover rather than a harsh solvent.
- If bubbling, seam overlap, or edge lift shows up, a short reheat and reseat usually fixes it; a persistent problem is a sign to consult a professional installer.
Pro Tip: Work in a warm room rather than applying any wrap in cold weather. Cool vinyl and shrink material resist adhesion and are far more likely to lift at the edges within weeks.
6. Caring for labels so they last
A label is only as good as its longevity, and a few habits make the difference between a design that looks sharp all season and one that fades by midsummer.
- Choose labels with a UV overlaminate or luster layer, which patent-documented wrap designs describe as a key factor in resisting fading over repeated sun exposure.
- Clean with a soft, damp cloth and a mild soap rather than solvents, which can lift edges or dull the finish.
- Dry clubs fully after a round before storing them, since trapped moisture is a common cause of early lift.
- Store your bag away from direct heat, such as a car trunk in summer, and plan on refreshing labels every season or two depending on how often you play.
7. Where Golf Blab fits into this process
We built our custom label line around exactly the problem this guide addresses: how to add personality to real clubs without drifting into non-conforming territory. Our personalized golf club labels are designed for the shaft, crown, and butt-end placements covered above, giving golfers a straightforward way to express individuality on the course. Alongside the product itself, our educational content on club personalization walks through design and application choices for golfers at every level. We also engage with professional golfers to keep our community engagement grounded in the realities of competitive play rather than guesswork.
An honest take on the personalization trend

Most advice on customizing clubs treats the topic as pure inspiration: mood boards, color palettes, and little mention of whether a design actually holds up under tournament scrutiny. That gap is where golfers get into trouble. The conventional wisdom overrates bold, oversized graphics and underrates the quieter details, a shaft band, a small monogram, that read as deliberate without ever approaching the impact area or the silhouette of the clubhead.
If there’s one priority worth putting ahead of everything else, it’s this: confirm placement and permanence before you fall in love with a design. A beautiful decal in the wrong spot is a problem you’ll discover at the worst possible moment, usually on the first tee of a round that matters. Golfers who treat the rules as a design constraint, rather than an afterthought, end up with equipment that looks sharp and never raises a question from a rules official or a playing partner. For event play specifically, it’s worth checking the tournament format you’re entering, since some local rules are stricter than the USGA baseline.
— Michael Marini
Order custom labels and coordinating gear
Once you know what you want, ordering is the easy part. Our Custom Golf Club Labels come in a range of ink colors and finishes sized for shafts, crowns, and butt ends, with straightforward turnaround from order to your mailbox. To round out the look, our Golf Blab Adidas Sport Polo and Golf Blab Adidas Space Dyed Polo pair naturally with a coordinated color scheme across your bag and labels.
Before you check out, run through a short list:
- Measure the shaft or crown area you’re targeting so your label fits cleanly.
- Choose a finish, matte or gloss, that matches your bag’s overall style.
- Decide on quantity for a full set rather than ordering piecemeal.
- Consider a UV overlaminate if you play frequently in strong sun.
Browse the full shop for labels, e-gift cards, and a chance to play a round with a tour pro.
FAQ
Is it legal to put decals on my golf clubs for tournament play?
Yes, temporary decals on the shaft or clubhead, other than the face, are generally permitted under USGA equipment interpretations as long as they don’t affect performance or act as an alignment aid. When in doubt for a specific event, removing the decal before play is the safest option.
Can I put a decal on the clubface for a decorative touch?
No, decorative material should stay off the impact area entirely. The official Equipment Rules allow decorative markings outside that zone, with only a small, tightly limited design permitted near its center.
What’s the easiest material for a first-time DIY application?
Vinyl decals are the most forgiving choice because they require no heat and are easy to remove or reposition if the placement isn’t perfect. Heat-shrink wraps look more seamless but take a steadier hand and more practice.
How long do custom golf club labels typically last?
With a UV overlaminate and proper care, most labels hold their color and adhesion for a season or more before needing replacement. Storing clubs away from direct heat and avoiding harsh solvents during cleaning both extend that lifespan.
Can customizing my driver head with initials change what model it is?
Ordinarily, no. USGA submission guidelines note that adding a player’s name or initials to an individual driver head typically does not create a different model, though manufacturers are advised to consult the USGA when a design is more involved than a simple identifier.