Posted on

Golfers: Course Ready Setups and Drills for Uphill and Downhill Lies

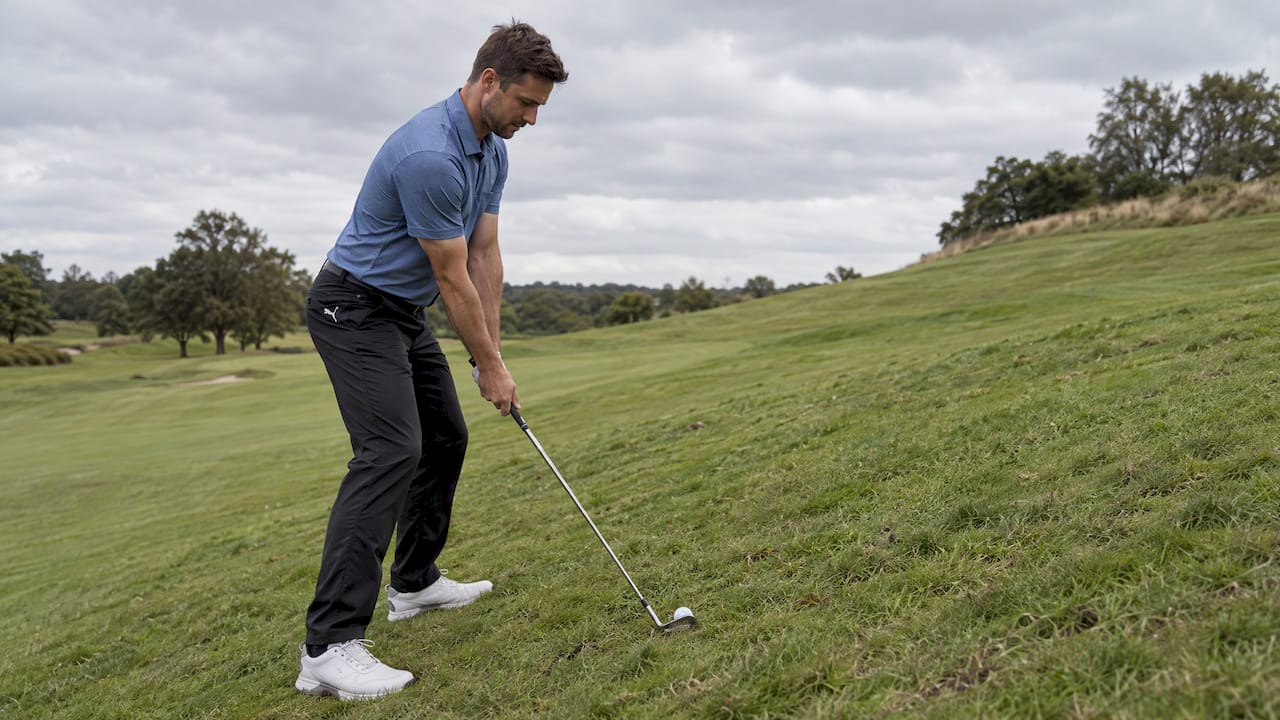
Golfer addressing ball on sloped fairway

Uphill adds loft, so take more club. Downhill delofts the face, so take less. The three setup changes that matter most are ball position, shoulders set parallel to the slope, and weight distributed toward the lower foot on uphill shots and the lead foot on downhill ones. The error that ruins both shots is the same: trying to help the ball into the air instead of swinging with the terrain beneath you.


TL;DR:

  • Take more club on uphill shots and aim slightly right to compensate for the slope’s loft and impact effects, ensuring a natural release.
  • On downhill lies, club less and position the ball back in your stance to prevent fat or thin strikes caused by delofting.
  • Always align your shoulders parallel to the slope and shift your weight toward the lower foot to match the terrain and improve contact.
  • Practice shots from multiple lie types, focusing on predicting launch and carry to develop feel and confidence under pressure.
  • Adjust club selection based on slope severity and turf condition, using wider stances and shorter swings for better balance and control.

Golf Blab
Build Confidence On Every Lie
Golf Blab offers instructional resources and personalized golf club labels for golfers working on skills, style, and course confidence.

Visit Golf Blab

Table of Contents

Uphill lies: setup, club choice, and swing thoughts

An uphill lie behaves like a hidden extra club of loft tucked into the face of your iron. The slope launches the ball higher and steals distance, a pattern instructors at the NCGA describe as a predictable effect of the incline rather than a swing flaw. The fix starts before you ever take the club back.

  • Set your shoulders and hips parallel to the slope so your swing plane matches the hill rather than fighting it.
  • Move the ball slightly forward in your stance to account for the steeper angle of attack.
  • Shift a touch more weight onto your trail foot, since the hill already pushes you that direction.
  • Take more club than the yardage suggests for an uphill lie, increasing further with the severity of the slope.

Right-handed golfers tend to pull uphill shots left, since the slope closes the clubface slightly through impact. Aiming a touch right of your normal target and letting the ball release naturally, rather than steering it, usually solves this without altering your swing.

Pro Tip: Let the slope do the lifting. Swing along the hill instead of swinging up to meet the ball, and the extra loft will take care of itself.

Downhill lies: setup, club choice, and swing path

A downhill lie does the opposite job on your clubface: it delofts the iron, which sends the ball out lower and rolls it farther once it lands. The NCGA and other instructors agree the adjustments here mirror the uphill shot almost exactly, just reversed.

  • Set your shoulders parallel to the slope with your lead shoulder lower than your trail shoulder.
  • Play the ball slightly back in your stance to catch it before the clubhead bottoms out.
  • Shift more weight onto your lead foot at address and keep it there through impact.
  • Take less club than the yardage calls for, as the shot will run farther once it lands.

The single biggest downhill mistake, according to Golf Digest, is the instinct to help the ball into the air. That instinct causes golfers to hang back on their trail foot, which almost guarantees a fat or thin strike.

Pro Tip: Swing down the slope, not up and out of it. Finish your backswing fully before starting down, a move Trevor Immelman credits for keeping the weight moving forward instead of hanging back.

A setup checklist for any sloped lie

Before you touch a club, read the lie. The PGA recommends letting the slope narrow your club selection first, then fine-tuning for yardage, rather than picking a club by distance and hoping the lie cooperates.

  1. Read the slope: uphill, downhill, or sidehill, and how severe.
  2. Set your stance slightly wider than normal for extra stability.
  3. Align your shoulders and hips parallel to the slope, not to the horizon.
  4. Position the ball forward for uphill lies, back for downhill lies.
  5. Shift your weight bias toward the lower foot on uphill shots, the lead foot on downhill shots.
  6. Choke down slightly on the grip if the lie is severe, for added control.
  7. Select your club: one more for moderate uphill, one less for moderate downhill, adjusting further for severity.

Sidehill lies add a different wrinkle. When the ball sits above your feet, expect a pull and plan for extra club, as outlined by PGA.com. When it sits below your feet, expect the opposite curve and adjust your aim accordingly. A proper stance is the foundation that makes every one of these reads usable under pressure.

Common mistakes and quick fixes for slope shots

Most slope shots go wrong for one of four reasons, and each has a specific, repeatable fix.

  • Helping the ball up: hanging back on the trail foot causes thin or fat contact. Fix: commit your weight forward through impact, especially on downhill lies.
  • Picking the club by yardage alone: ignoring the lie leads to the wrong trajectory before you even swing. Fix: read the slope first, then adjust the number.
  • A base that’s too narrow: an unstable stance amplifies every other error on uneven ground. Fix: widen your feet and lower your center of gravity slightly.
  • Scooping at impact: trying to lift the ball instead of trusting the loft produces thin contact on both slopes. Fix: swing through along the slope’s natural angle and let the loft work.

These four fixes resolve the majority of poor contact on sloped lies, and they apply whether you’re facing a gentle rise on a municipal course or a steep drop on a mountain layout.

Practice drills to master uphill and downhill lies

Feel, more than theory, is what makes slope shots reliable under pressure. The PGA suggests building that feel through repetition across a range of lie types rather than drilling one slope in isolation.

  1. Nine-ball progressive-lie drill. Find or build three lies: clean, slightly uphill, and slightly downhill. Hit three balls from each, predicting your launch and carry before you swing, then compare the actual result.
  2. Landing-pattern drill. Using clubs from wedge through 8-iron, hit shots from an uphill or downhill lie and track where each one lands relative to a flat-ground shot with the same club.
  3. Progressive-swing routine. Start with half swings on each slope until contact feels solid, then build up to full swings once you can strike the ball consistently.

Recording your predicted versus actual results, a method PGA.com recommends for building pattern recognition, turns guesswork into a usable mental library you can call on mid-round.

Pro Tip: Practice slope shots from the same few spots on the range or short game area rather than tearing up new turf each time, using golf at home practice drills to build consistency and feel. Your legs will learn the balance faster when the ground itself becomes familiar.

Equipment considerations for sloped lies

Your clubs don’t change shape on a hillside, but how they behave does. A shaft that’s too stiff for your tempo can feel unforgiving on a downhill lie, where timing matters more than usual because the ball is already positioned back and the margin for early release narrows. A shaft with appropriate flex for your swing speed helps the clubhead release naturally through impact rather than forcing you to manipulate the face mid-swing.

Length matters too. Choking down an inch on severe slopes, a move echoed across instructor guidance on sidehill shots, shortens your swing arc slightly and gives you better control of low-point contact. That small sacrifice in distance is worth the gain in consistency.

Grooves and lie angle also play a quiet role. A club with a lie angle that suits your natural setup reduces the amount of compensation you need to make for slope alone, since you’re not fighting your equipment on top of the hill. Understanding how loft and lie interact with your setup gives you a clearer sense of why the same 7-iron behaves differently on flat ground than on a 15-degree uphill rise.

None of this means you need a different set for sloped courses. It means knowing your current clubs well enough to trust their natural tendencies rather than overriding them at the worst possible moment.

Building confidence on a difficult lie

A sloped lie tests your mind before it tests your swing. The moment you see your ball resting above a steep drop or perched on a rise, the instinct is to tense up, shorten your breathing, and swing faster than you intend. That tension is often what turns a manageable shot into a mis-hit.

The antidote is a routine you trust more than the terrain. Walk up to the shot the same way every time: read the lie, pick the club, take your stance, and commit to one swing thought rather than five. Golfers who rehearse this sequence on the range, even without a slope present, tend to carry that same calm into the moment it actually matters.

Accepting that a slope shot rarely finishes exactly like a flat one also helps. A slightly shorter uphill shot or a slightly longer downhill roll isn’t a failure, it’s the physics of the hill doing what it always does. Expecting imperfection removes the pressure to force a perfect outcome and frees you to simply execute the setup you practiced.

Confidence on these shots isn’t about eliminating nerves. It’s about having enough repetitions in your memory that your body already knows what to do, leaving your mind free to commit rather than calculate.

How slope changes your divot and turf contact

The ground itself behaves differently depending on which way it tilts. On an uphill lie, the club naturally wants to bottom out later in the swing because the terrain is rising to meet it, which often produces a divot that starts later and digs slightly deeper than one on flat ground. On a downhill lie, the opposite happens: the ground falls away from the club, so your low point arrives earlier than expected, and a swing that doesn’t account for this will catch the turf behind the ball first.

Uphill and downhill turf contact comparison

This is part of why the “swing with the slope” cue matters so much. A swing path that follows the hill’s angle lets the club interact with the turf the way the shot requires, clipping the ball cleanly before brushing the ground on downhill lies, and compressing slightly deeper on uphill ones without catching the hill early.

Watching your divots after each practice rep tells you almost everything you need to know about whether your weight and swing path matched the slope. A divot that starts too far behind the ball on a downhill lie usually confirms you hung back. A thin strike on an uphill lie often means your weight stayed too far forward and the club bottomed out before reaching the ball. Reading your own turf marks turns every practice swing into feedback you can use the very next rep.

Shaping shots to work with the slope, not against it

Once the basic setup feels automatic, shaping your shot shape around the slope opens up more scoring options. On an uphill lie that naturally pulls the ball left for a right-handed golfer, a golfer comfortable fading the ball can lean into that tendency rather than fighting it, aiming slightly left of target and letting the natural pull bring it back toward the pin.

On severe uphill lies, particularly greenside ones, instructors at Golf.com suggest aiming slightly right when the ball sits above your feet, widening your stance, choking down, and playing the ball a touch back to avoid stubbing the shot into the hill. These are small compensations, but they are the difference between a clean strike and a chunked one on the course’s trickiest lies.

Downhill lies reward golfers who can flight the ball down intentionally, taking advantage of the lower launch the slope already provides. Rather than fighting the lower trajectory, a golfer can choose a stronger loft, let the slope do the work of keeping the ball low, and use the extra roll to reach greens that a normal trajectory would fly past. Shaping shots around slope rather than despite it turns a defensive situation into an offensive one, provided the fundamentals of weight and alignment are already solid.

Adjusting for wet, firm, and variable turf

Slope is only half the equation. The ground’s condition underneath your feet changes how much margin you have for error on every uphill or downhill shot.

Wet turf on an uphill lie often means your feet will slip slightly during the swing, so a wider stance and a shorter, more controlled swing help you maintain balance where you’d otherwise rely on firmer footing. Wet turf also tends to grab the clubhead more on downhill lies, which can slow your release through impact and leave shots short, so a touch more club is a reasonable adjustment when the ground is soft.

Firm, dry turf behaves almost the opposite way on downhill lies. The ball will run out farther once it lands, since firm ground offers less resistance to roll, so taking one additional club of “less” than you normally would on a downhill shot can overcorrect into a shot that sails the green entirely. Firm turf on uphill lies tends to reward a slightly cleaner strike, since the ball comes off the face hotter than it would from softer ground.

The practical takeaway is to treat turf condition as a second filter after you’ve read the slope itself. A severe downhill lie on firm turf calls for a more conservative club than the same slope on wet ground, and an uphill lie in soft conditions may need an even longer club than the slope alone would suggest. Reading both the hill and the ground beneath it, rather than one or the other, is what separates golfers who guess from golfers who commit with a clear plan.

Adjusting for wet, firm, and variable turf — overview diagram

Why Golf Blab teaches slope shots this way

Small setup changes, repeated with attention, build the kind of feel that no single tip can replace. That’s the foundation of how Golf Blab approaches instruction: pairing focused practice like Play Golf with a Tour Pro with the right gear so golfers can track real improvement, not just memorize advice. Try one drill from this guide this week, and watch what happens to your contact.

— Michael Marini

Practice the slope, then gear up for it

Reading a slope correctly is only half the job. Showing up with the right tools makes the practice stick, which is where Play Golf with a Tour Pro gives you focused, hands-on time working through uphill and downhill lies with someone who can see what your eyes can’t. Pair that session with Innovate Tour Performance Golf Balls for shots that respond predictably off firm or wet turf, and a set of Custom Golf Club Labels so every club in your bag is one glance away from the right choice on a tricky lie. Browse the full Golf Blab shop to put together your own practice kit.

FAQ

Should you club up on a downhill lie?

No, you generally club down on a downhill lie, since the slope delofts the clubface and the ball tends to launch lower and run farther once it lands. Most instructors recommend one less club for a moderate downhill slope, adjusting further for steeper hills, a guideline echoed in Golf.com’s setup advice.

What is the hardest shot to hit in golf?

There’s no single universally agreed answer, but severe sidehill and downhill lies rank among the toughest because they combine an unfamiliar stance with the instinct to help the ball up, which causes the fat or thin contact instructors warn against. Confidence and a trusted pre-shot routine matter as much as technique on these shots.

What is the difference between an uphill lie and a downhill lie in golf?

An uphill lie effectively adds loft to your club, launching the ball higher and shorter, while a downhill lie removes loft, producing a lower flight with more roll once it lands. Setup also reverses: uphill calls for the ball slightly forward and weight toward the trail foot, while downhill calls for the ball slightly back and weight toward the lead foot, as detailed by the NCGA.

Where should I place my ball when playing a downhill lie?

Position the ball slightly back in your stance compared to a flat lie, which helps you catch it cleanly before the clubhead reaches its lowest point on the slope. Combine this with a lower lead shoulder and forward weight bias for the most reliable contact.
Sources

Posted on

Track Your Golf Gear With USGA Safe Labels That Last for Golfers

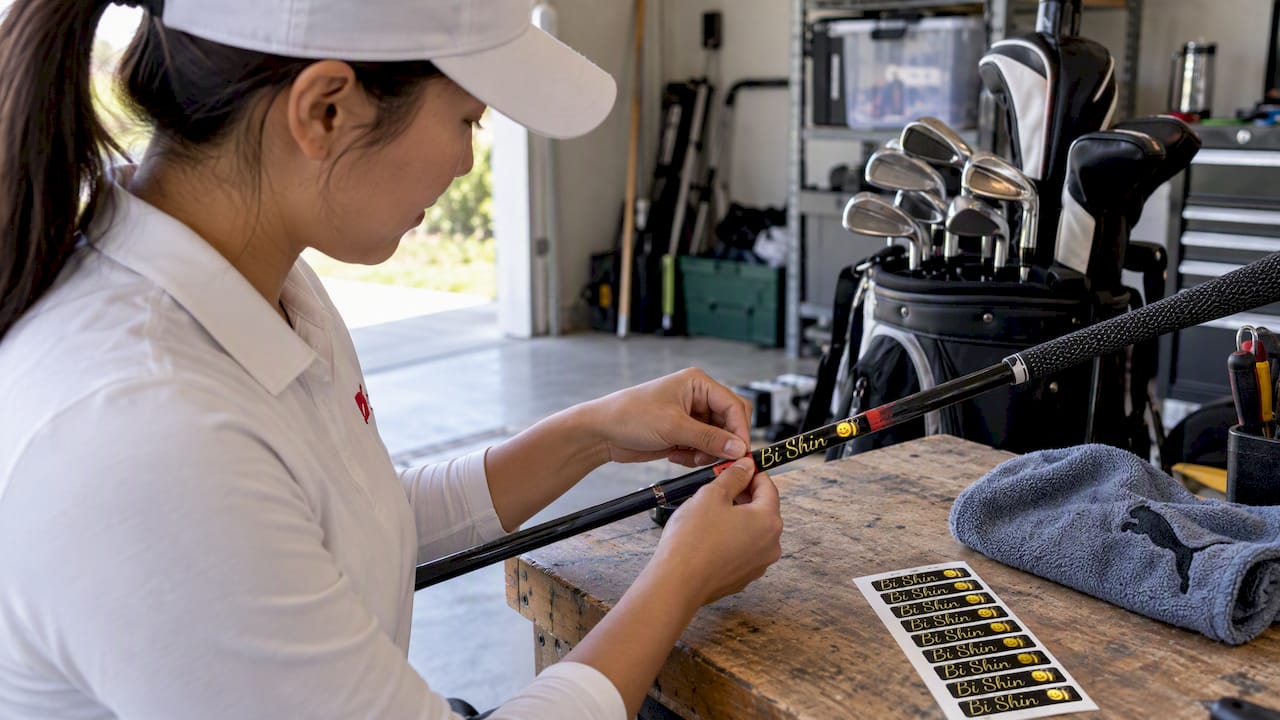
Golfer applying custom label to golf club

The simplest, tournament-safe way to track golf gear is a set of durable, semi-permanent personalized labels paired with a lightweight inventory list. This combination keeps every club identifiable, holds up through seasons of play, and stays within the rules that govern what you can attach to equipment. Apply the labels correctly, as outlined below, and your clubs become both unmistakably yours and simple to recover if they ever wander off.


TL;DR:

  • Custom vinyl shaft labels are recommended for durability, especially in outdoor conditions, and should be placed below the grip or on the grip itself.
  • USGA rules permit temporary identification attachments on the shaft and clubhead, but labels must serve only identification purposes without altering club behavior.
  • Regularly clean labels with mild soap and water, protect against temperature swings, and replace them when edges lift or print fades to maintain clarity.
  • Pair each label with a digital record and photos to facilitate quick recovery if clubs are misplaced or lost during play.
  • Golf Blab offers personalized, durable labels for $29.99 per full set, which can be color-coded and matched with gear for easy on-course identification.

Golf Blab
Make Your Golf Gear Unmistakably Yours
Golf Blab creates personalized golf club labels that combine practical identification with a style that reflects your individuality on the course.

Explore Golf Blab labels

Table of Contents

Tagging options: formats, pros and cons

Every tagging method trades off durability, visibility, and compliance a little differently, so the right choice depends on how and where you play.

  • Custom stick-on labels: easy to apply and remove, affordable, but shorter-lived outdoors without a protective layer.
  • Vinyl or laminated labels: resist moisture and friction far better than paper-backed stickers, making them the sturdier pick for a bag that lives in the trunk.
  • Heat-shrink shaft labels: wrap tightly around the shaft for a clean, almost factory look, though they require a heat source and a bit of patience to apply well.
  • Hang or tie tags: ideal for bags and headcovers since they’re removable in seconds, but too loose a fit for clubheads or shafts.
  • Semi-permanent clubhead markings: offer the most lasting identification directly on the equipment, though they demand careful placement to avoid alignment marks.
  • Electronic ID devices: useful for identification and inventory purposes only, and only when they serve no other function.

A daily player who wants a signature look might favor vinyl shaft labels. Someone managing a loaner set at a club or academy often leans on color-coded hang tags for quick sorting. Travelers benefit from heat-shrink durability, while tournament golfers should stick to options confirmed as temporary and identification-only, since that distinction matters once you’re inside the ropes.

USGA rules and what they mean for labels and attachments

The USGA’s interpretations allow temporary, non-permanent attachments to the shaft, such as identification decals, and permit similar identification-only attachments on the clubhead, away from the face, as long as they serve no other purpose. That single allowance is what makes personalized labeling possible without drifting into equipment modification.

Custom Golf Club Labels

One rule shapes nearly every labeling decision: identification attachments must do nothing else. The USGA’s electronic device guidance confirms that electronic ID units limited to owner information, inventory tracking, or detecting club use are permitted, provided they never emit light, sound, or vibration and perform no additional function.

Clubhead markings follow a separate standard. According to the USGA’s submission guidelines, permanent markings that differentiate a model must be clear and lasting, and stick-on labels are not recognized as official identifying markings. Personalizing a driver with a name or initials is usually fine, so long as it doesn’t effectively create a different model.

USGA comparison of golf club identification markings

How to label your clubs and gear step-by-step

A good label job starts well before the adhesive ever touches the shaft.

  1. Clean the surface with a mild soap and water solution, then dry it fully. Skip sanding on painted or coated finishes, since abrading them can dull the surface or void a manufacturer’s finish warranty.
  2. Choose your placement. The shaft just below the grip, the grip itself, or the butt end all work well; avoid the clubface and any area near alignment marks or the crown, where the USGA’s clubhead marking guidance recommends keeping orientation indicators unobstructed.
  3. Apply the label. Stickers press on directly; heat-shrink wraps need gentle, even heat until they conform snugly; vinyl wraps benefit from a few minutes of light pressure to seal the edges.
  4. Let it cure. Give adhesive-based labels a few hours before heavy handling, and let heat-shrink pieces cool completely before gripping the club.
  5. Log the club. Record the club name or number, the label’s unique ID code, its color, and the date it was applied.

Pro Tip: Keep a small log on your phone with a photo of each labeled club next to its ID code, so a lost-and-found call takes seconds to confirm.

Golf Blab’s own guide to labeling clubs walks through placement and material choices in more detail if you want a visual reference while you work.

Maintain labels and avoid common failures

Labels fail for predictable reasons, and most of them are easy to prevent.

  • Clean with mild soap and water, never with solvents or alcohol-based cleaners that can dissolve adhesive from underneath.
  • Protect against temperature swings by keeping clubs out of a hot trunk for long stretches, which softens adhesive and invites peeling.
  • Replace rather than repair once edges lift or print fades past easy reading, since a half-peeled label looks worse than a fresh one.
  • Add a clear overlaminate or a thin coat of clear nail polish over paper-backed labels to extend their life outdoors.

Seasonal care matters more than most golfers expect. A label that survives a mild spring can curl fast once summer heat and humidity set in, so a quick check every few weeks keeps your identification intact.

Track and recover lost gear: simple inventory and on-course tactics

A label only helps if someone can act on it, so pair every tag with a record you can check in seconds.

  • Keep a lightweight inventory, whether a spreadsheet or a phone note, tied to each label’s unique ID.
  • Include a name and a contact method on labels meant for recovery, balancing visibility with your own privacy preferences.
  • Color-code by set or bag so a pro shop staffer can match a stray club to its owner at a glance.
  • Photograph each club next to its ID entry, which speeds up identification if a club turns up days later.
  • Remove or cover identifying details before formal tournament play if local rules require it, then restore them for casual rounds.

A Mulligan+ Journal piece on tracking golf rounds offers a useful companion approach for golfers who already track performance data and want their equipment records to match.

Why choose custom Golf Blab labels and how to order

Golf Blab’s Custom Golf Club Labels turn the guidance above into a ready product: durable materials, color options, and placements designed to sit cleanly on the shaft or grip without crowding alignment marks. At $29.99 one-off, the set gives a full bag a consistent, personalized look that holds up through a season of play.

  • Pick a label style that matches your bag’s palette or your own signature color.
  • Color-code by club type so a quick glance tells you wedge from iron, even from across the fairway.
  • Pair labels with matching gear, like the Golf Blab Under Armor Golf Hat or the Golf Blab Adidas Quarter Zip Pullover, for a complete, personalized look on the course.

Browse the full Golf Blab shop to see label colors, apparel, and gift card options side by side before placing an order.

A golfer’s perspective on labeling and recovery

I’ve watched a single misplaced wedge turn into a half-hour search more times than I can count, and almost every time, the club that came back was the one with a clear, legible label near the grip. One member at a club I played with found his 7-iron three carts down the row because his name and number were impossible to miss.

My one tip that rarely makes it into product listings: label the headcover and the shaft separately. Covers get swapped at the turn more often than clubs do, and a mismatched pair causes more confusion than a missing label ever would.

— Michael Marini

FAQ

Temporary, non-permanent labels for identification are generally permitted on the shaft, and similar identification-only attachments are allowed on the clubhead away from the face, according to the USGA’s interpretations. Stick-on labels are not recognized as official identifying markings for model differentiation, but that distinction matters for manufacturers, not for a player labeling personal gear.

Can I use an electronic tracker to find a lost club?

Electronic devices are allowed for identification and inventory purposes only, provided they don’t emit light, sound, or vibration and perform no other function, per the USGA’s electronic device guidance. A simple identification tag paired with a personal inventory list remains the easier, lower-cost route for most golfers.

Where should I place a label so it doesn’t interfere with alignment marks?

Place labels on the shaft below the grip, on the grip itself, or at the butt end, keeping clear of the crown and any alignment indicators. The USGA’s submission guidelines note that markings near orientation features can complicate conformity checks.

How much do custom golf club labels cost?

Golf Blab’s Custom Golf Club Labels are priced at $29.99 one-off for a full set, covering an entire bag with consistent, durable identification.

What’s the best way to keep track of my golf gear over time?

Pair durable labels with a simple inventory, whether a spreadsheet or a phone note, that records each club’s unique ID, color, and purchase date. Photographing each labeled club alongside its entry makes recovery faster if a club is ever misplaced.

Posted on

60/40 Practice Plan With a Coach That Transfers to the Course

Coach and golfer reviewing an on-course shot

A practice plan with a coach is a co-designed, goal-oriented session built on the Plan-Act-Review method, splitting time with a majority on strengths and a smaller portion on weaknesses to create real, measurable improvement. Consider bringing this framework to your next lesson, and start logging every session so progress becomes visible rather than assumed.


TL;DR:

  • Effective practice sessions should follow a structured plan, with clear time blocks for warm-up, short game, full swing, and course simulation to maximize improvement.
  • Using a goal-oriented approach such as S.M.A.R.T. targets and the 60/40 practice division helps focus on weaknesses without sacrificing confidence.
  • Combining random and blocked drills, based on skill level, supports better retention and transfer of skills compared to repetitive, predictable routines.
  • Maintaining a detailed log of key metrics and pattern recognition enables personalized coaching and quicker progress over time.
  • Regular coaching intervals aligned with progress milestones, along with mental focus and visualization drills, strengthen both technique and performance consistency.

Golf Blab
Build Practice That Transfers
Golf Blab combines targeted instructional content with personalized golf products to support improvement, confidence, and individuality on the course.

Explore Golf Blab

Table of Contents

A 60 to 90 Minute Session Template You Can Try Today

Purposeless practice is the quiet thief of golf improvement, according to USGA research on practice facility design, which found that players stall out when sessions lack structure. A timed template solves this by giving every minute a job.

  1. Warm-up (5 to 10 minutes): Loosen up with dynamic stretches, then rehearse your pre-shot routine on a few easy chips.
  2. Short-game block (20 to 25 minutes): Rotate putting and chipping to variable targets, changing distance and lie after every three balls.
  3. Full-swing block (25 to 30 minutes): Hit to specific targets with alignment sticks down, running your full pre-shot routine on every attempt.
  4. On-course simulation (10 to 15 minutes): Play a hole in your mind, hitting one ball per shot type under scorecard pressure.
  5. Cool-down and debrief (5 minutes): Stretch briefly, then talk through what worked with your coach or in your own notes.

Inside that structure, a handful of drills do most of the heavy lifting:

  • Ladder putting: Place three balls at increasing distances and make all three before moving on.
  • Gate drill: Set two tees just wider than the clubhead at address to sharpen your strike pattern.
  • Box game: Toss a target zone the size of a green and count how many approach shots land inside it.

This structure echoes the practice routines that support real performance gains, and it works equally well solo or under a coach’s eye.

Pro Tip: Treat every range ball like it counts on the scorecard. Coaches who study elite practice habits point to full pre-shot routines as the bridge between range success and course results, a point echoed in PGA game-planning guidance.

A 60 to 90 Minute Session Template You Can Try Today — overview diagram

Setting S.M.A.R.T. Goals With Your Coach

Vague intentions like “get better at putting” rarely survive contact with a real round. A golf coach worth hiring will push you toward something specific: reduce three-putts by 30% in eight weeks, or tighten approach dispersion inside 100 yards by two clubs’ width.

Once the goal is set, allocate practice time using the 60/40 principle: roughly 60% of your reps reinforce what you already do well, and 40% target the weakness, a ratio drawn from PGA coaching guidance built around structured, goal-oriented practice. Overcorrecting toward weaknesses alone tends to erode confidence faster than it fixes flaws.

A sample milestone schedule might look like this:

  • Weeks 1 to 2: Baseline your current three-putt rate and dispersion pattern.
  • Weeks 3 to 5: Introduce a new lag-putting drill; recheck the number at week five.
  • Weeks 6 to 8: Compare against the original baseline and set the next target with your coach.

Should Your Practice Be Random or Blocked

Motor-learning research offers a clear, if counterintuitive, answer: mixing shots and targets usually beats repeating the same swing over and over. Experimental work on variable practice and attention focus found that random practice supports better retention and transfer than blocked repetition in putting-style tasks, particularly for players who already have some skill.

A 2024 systematic review in Frontiers in Sports and Active Living found that external focus and contextual interference rank among the more effective motor-learning strategies in golf, though transfer from simple drills to full competitive play still carries caveats. That means a smart session blends both styles rather than picking one camp.

  • Beginners: Lean toward more blocked reps early to build a feel for the motion, then introduce variability gradually.
  • Intermediate players: Aim for a mix, roughly half blocked and half random, changing targets or clubs between shots.
  • Advanced players: Favor random practice, simulating on-course unpredictability with varied lies, distances, and pressure.

Research on variable practice loads suggests moderate variability, rather than very low or very high, often produces the largest learning gains. The practical rule: start with a moderate mix of targets and clubs, then increase variety as your consistency improves.

The Plan-Act-Review Process for Every Shot

Plan-Act-Review turns a bucket of balls into a feedback loop. Before each shot, name your target, your intended ball flight, and run your routine. After the shot, note the outcome and the likely cause, then adjust the next attempt accordingly.

  1. Plan: Pick a target, visualize the shot shape, complete your pre-shot routine.
  2. Act: Commit fully and swing without second-guessing mid-motion.
  3. Review: Log the result, the miss pattern, and one adjustment for the next rep.

At session’s end, a three-question debrief keeps the loop honest: What worked? What repeated as a miss? What’s the one thing to carry into the next session? A simple log row might read: Date, drill, target, outcome, miss pattern, adjustment.

Pro Tip: Bring last week’s log to your lesson. Coaches who see documented patterns, rather than a vague “my slice is back,” can prescribe a sharper fix in less time.

How Often Should You See a Coach

Lesson cadence depends on the goal, not the calendar. Weekly lessons suit players chasing a specific short-term fix, biweekly sessions fit steady, ongoing development, and monthly check-ins work well once you’re mostly practicing independently and just need periodic correction.

A 12-week arc might unfold like this:

  • Weeks 1 to 2: Initial lesson, baseline assessment, and goal-setting with your coach.
  • Weeks 3 to 4: Independent practice using the session template, first checkpoint lesson.
  • Weeks 5 to 8: Continue practice blocks, checkpoint every two to four weeks to measure against milestones.
  • Weeks 9 to 12: Shift toward independent practice, with a final lesson to confirm the new pattern holds under pressure.

As checkpoints show consistent gains, space lessons out further and let your own logs, not habit, dictate the next appointment.

What to Track and How to Log It

Good tracking is short, not exhaustive. Core metrics worth logging include proximity to the hole on approach shots, greens in regulation, shot dispersion, and how consistently you complete your pre-shot routine.

A minimal weekly summary might include: sessions completed, three-putt count, approach proximity average, and one note on what felt different. Video is worth adding when a swing change is in progress. Launch-monitor data, meanwhile, adds real value once you’re chasing sub-two-yard dispersion gains, according to PGA practice guidance recommending logs shared directly with a coach, but it’s overkill for a player still working on basic contact.

  • Track weekly: three-putt count, GIR, approach proximity, routine consistency.
  • Track monthly: dispersion patterns and video comparisons against baseline.

Talking to Your Coach So Practice Actually Sticks

The best coach-player relationships run on shared language, not guesswork. When you describe a miss as “it felt off,” your coach has little to work with. Describe the ball flight, the strike quality, and what your body felt like at impact instead.

Set expectations early about how you’ll communicate between lessons. Some coaches welcome a quick video clip mid-week; others prefer everything saved for the in-person session. Either way, agree on the channel so feedback doesn’t get lost.

During the session itself, ask for the “why” behind a correction, not just the fix. A coach who explains the cause of a swing fault gives you a tool for self-diagnosis later, which matters once lessons space out. Top-level coaching perspectives emphasize helping players become their own best coach over time, which starts with understanding, not just repeating, instruction.

Bringing a practice log to lessons can help identify patterns quickly, allowing more focused adjustments. Close each session by repeating back the one swing thought you’re taking into practice, so there’s no ambiguity about what “practice” means until you meet again.

Training the Mind Alongside the Swing

Ball-striking gets most of the attention, but the mental side of practice deserves its own block. Visualization before each shot, picturing the flight and landing spot, primes the same neural pathways used in execution, which is part of why a consistent pre-shot routine matters as much for focus as for mechanics.

Build a simple pressure drill into your session: give yourself one ball per shot type and treat it like the eighteenth hole of a club championship. This forces the same focus narrowing you’ll need on the course, where do-overs don’t exist.

Four-part golf mental practice sequence

A short reset routine, a breath, a single word cue, or a glance at the target, helps you recover from a bad shot without carrying it into the next one. Coaches who build mental focus workflows into practice tend to see players hold their routine together later in a round, when fatigue and pressure usually erode it first.

Treat visualization and focus drills as reps, not afterthoughts. Five minutes of deliberate mental practice at the end of a session, rehearsing your routine under imagined pressure, reinforces the habits your coach is building on the range.

What Twenty Years on the Range Taught Me About Practice

The golfers who improve fastest aren’t the ones who hit the most balls. They’re the ones who show up with a log, a target, and one swing thought instead of five. Chasing every flaw at once dilutes attention and slows progress more than it speeds it.

Shared language with your coach matters more than any drill. Describe misses precisely, bring documentation, and resist the urge to fix everything in a single session.

— Michael Marini

Put This Plan to Work With Golf Blab

Structure is only half the equation. The other half is having the right coaching and gear behind it, which is where Play Golf with a Tour Pro fits naturally into a lesson cadence, giving you direct access to tour-level insight at key checkpoints in your 12-week arc.

A few products round out the plan:

  • Custom Golf Club Labels: Mark your clubs so target work and club selection stay organized during drills.
  • Innovate Tour Performance Golf Balls: A consistent ball for dispersion tracking session to session.
  • Golf Blab apparel, including the Adidas Sport Polo and Adidas Space Dyed Polo, for comfort through long range sessions.
  • Golf Blab E-Gift Cards, a fitting gift for a golfer building their own coach-led plan.

Visit the Golf Blab shop to gear up for your next session.

Sources

FAQ

What is a practice plan with a coach?

It is a structured, goal-oriented session designed together with your coach, built around the Plan-Act-Review process and a roughly 60/40 split between reinforcing strengths and correcting weaknesses. The plan gives every practice minute a specific purpose tied to a measurable goal.

How often should I take lessons while following a practice plan?

Cadence depends on your goal: weekly lessons suit a specific short-term fix, biweekly sessions fit steady development, and monthly check-ins work once you’re practicing mostly on your own. A 12-week arc with checkpoints every two to four weeks gives most players enough structure to see real progress.

Should I use random or blocked practice?

Research on variable practice and focus of attention shows random practice tends to support better retention and transfer than blocked repetition, especially for players beyond the beginner stage. Beginners benefit from more blocked reps early on, then should shift toward variable practice as consistency builds.

What should I track during practice sessions?

Focus on a few core metrics: proximity to the hole, greens in regulation, shot dispersion, and pre-shot routine consistency. A short weekly summary of these numbers, paired with occasional video, gives your coach enough to spot patterns without turning practice into paperwork.

Can Golf Blab help me find a coach or lesson format?

Golf Blab offers Play Golf with a Tour Pro sessions that pair well with the lesson cadence described in this plan, alongside instructional content and products like custom club labels built to support consistent practice.